Getting started
You will find that many concepts that modern applications need are built right into Grasshopper. User management, flexible data storage, permissions, plus much more are bundled into the framework.
Grasshopper is modular and built on top of a modern web development stack. It was written entirely in JavaScript and it uses a NoSQL database system. File storage can either be local or in the cloud on a CDN. As the project matures, more database systems and CDN options will become available.
Currently, Grasshopper will run in any environment that supports Node.js and MongoDB. This is great news since loading Node.js apps into modern cloud containers is very simple. Users hosting the application themselves or using services like Heroku, Engine Yard or any other PaaS (Platform as a Service) are fully supported.
Every implementation of the system is different but keep reading and you will start to get a sense of how the project is organized.
Definitions


Node.js is a platform built on Chrome's JavaScript runtime for easily building fast, scalable network applications.
npm npm is the official package manager for Node.js. npm is bundled and installed automatically with the environment.
GruntJS is a JavaScript based command line build tool that helps developers automate repetitive tasks.
ExpressJS is a minimal and flexible node.js web application framework, providing a robust set of features for building single and multi-page, and hybrid web applications.
MongoDB is an open-source document database, and the leading NoSQL database.
NoSQL databases explained.
CDN or content delivery network is a large distributed system of servers deployed in multiple data centers across the Internet.
PaaS or Platform as a Service provides a solution stack as a service. IE: Heroku or others like it.
Grasshopper Stack
Typical Grasshopper Application Stack
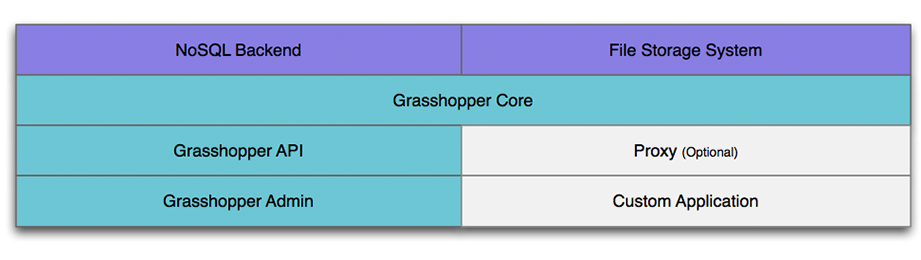
Grasshopper Core is responsible for all the heavy lifting of the framework. Core includes methods for managing users (data and access), content types, content, nodes (or folders) and assets.
Grasshopper API is an HTTP wrapper of core designed to run on HTTP or HTTPS protocols.
Grasshopper Admin is a fully functional administration application that uses the API to manage your applications.
Proxy is an optional express application that can site along side the Grasshopper API to extend the base functionality.
Requirements
The Grasshopper framework uses all of the below software/services:
Git version control system.
Node.js, a platform for easily building fast, scalable network applications.
MongoDB, an open-source document database that Grasshopper uses for data storage.
Grunt, the JavaScript task runner
bower, a package manager for the web
Sass, Syntactically Awesome Style Sheets.
Bundler: Bundler provides a consistent environment for Ruby projects by tracking and installing the exact gems and versions that are needed.
Sass Globbing Plugin (used to compile the admin), Sass globbing allows you to import many sass or scss files in a single import statement.
Sass CSS Importer (used to compile the admin): The Sass CSS Importer allows you to import a CSS file into Sass.
Access to local file system or CDN like Amazon S3.
npm install -g grunt-cli
npm install -g bower
gem install sass-globbing
gem install sass-css-importer
Installation
Installing Grasshopper is super simple. Once your machine is configured, creating a new project is as easy as typing grasshopper fly.
The installation process fully configures working instances of core, api and admin for you.
See the example of how to install the NPM and setup a new project. We assume that all of the prerequisite software is already installed.
Watch a video of an installation (less than a minute):
Loading the player ...
npm install -g grasshopper-cli

mkdir myproject

cd myproject

grasshopper fly

-- That's it, you have a working site. Just make whatever configuration changes you need to the project and you are on your way.
Configuring your project
When you run the grasshopper fly command, you get a fully functional application, but you may want to change some of the configuration values.
The configuration values are passed into grasshopper-api.
Api / Core
Start grasshopper api is done by requiring it in and passing in an options object. A convenient way to do this is to create a JSON config file and use it as the options object as follows:
var ghapi = require('grasshopper-api'),
    options = require('./grasshopper-config.json'),
    ghcore,
    ghapiRouter,
    returnedObject;

returnedObject = ghapi(options);

// the router should be used in conjunction with express
// it can be added directly to the app or piggy backed on another router
// e.g. expressApp.use('/api', ghapiRouter);
ghapiRouter = returnedObject.router;

// ghcore can be used to make queries, etc.
ghcore = returnedObject.core;
Here is an example file:
{
    "server": {
        "https":{
            "key":"{full path to key}",
            "cert":"{full path to cert}"
        },
        "proxy" : false,
        "maxFilesSize": 2000000,
        "maxFieldsSize": 2000000,
        "maxFields": 1000
    },
    "crypto": {
       "secret_passphrase" : "{unique term per project}"
    },
    "db": {
       "type": "mongodb",
       "host": "mongodb://localhost/{database name}",
       "shorthost":"localhost",
       "database": "{database name}",
       "username": "",
       "password": "",
       "defaultPageSize" : "10000",
       "debug": false
    },
    "assets": {
       "default" : "local",
       "tmpdir" : "{absolute path to tmp directory}",
       "engines": {
            "local":{
                "path":"{absolute path to public asset folder from the root of your comp}",
                "urlbase":"{full url base to serve files from}"
            }
       }
    },
    "logger" : {
       "adapters": [{
            "type":"console",
            "application":"{application name}",
            "machine":"{machine name}"
       }]
    },
    "identities" : {
        "google" : {
            "appId" : "{ your google app id }",
            "secret" : "{ your google secret id }",
            "scopes" : [ "{ array of scopes you want to authorize }" ],
            "redirectUrl" : "{ the url you want to redirect to after successful auth, the users token will be appended to this route ex. '/login' entered here will send the user to '/login/googleToken' }"
        }
    },
    "bodyParser" : {
        "limit" : "5m"
    }
}
Definitions for all possible config values
- server (optional)
- https: If you need to run the API over https then you should include the server configuration
- key: Absolute path to SSL private key
- cert Absolute path to SSL certificate
- proxy: Defaults to false. Boolean indicating whether you are going to proxy the api onto another express server. If False, when you initialize API, it will create a server for you.
- maxFilesSize: Defaults to 2 megabytes. The Maximum file size you are allowed to upload. In bytes.
- maxFieldsSize: Defaults to 2 megabytes. The maximum field size you are allowed to have. In bytes.
- maxFields: Defaults to 1000. The maximum number of fields you are allowed to have.
crypto (required)
- secret_passphrase: Unique key that will be used when encrypting/decrypting values using the utils/crypto module.
db (required)
- type: Always should be 'mongodb' until more database storage engines are supported.
host: Full URL of your mongo database connection
mongodb://[username:password@]host[:port]/[database][?options]
shorthost: Identifies either a hostname, IP address, or unix domain socket
database: Name of the database to login to
username: (optional) If given, it will attempt to login after connecting to a database server
password: (optional) If given, it will attempt to login after connecting to a database server
defaultPageSize: The number of results to be included in a "page." This value can be customized per your application
debug: (true/false) Debug mode of "true" will turn on db logging
assets (at least 1 engine is required)
- default: local/amazon
- tmpdir: Absolute path on your local system where temporary files will be saved
- engines: One or more ways to store assets that are posted to Grasshopper
- local: Engine needed if you plan on storing files locally on your server
- path: Absolute path to the "publically" browsable asset folder
- urlbase: The base URL that will be serving the files (ex: https://yoursite.com/assets)
- amazon: If you are going to use Amazon's S3 to store your files then you will need to define the amazon engine.
- accessKeyId: Your AWS access key ID
- secretAccessKey: Your AWS secret access key
- region: The region to send service requests to
- bucket: Buckets partition the namespace of objects stored in Amazon S3 at the top level
- urlbase: The base URL that will be serving the files (could be your own or amazon's)
- assetsDir: A prefix (folder) to add to your s3 keys. The keys are the node id combined with the file name.
- archiveDeletionsTo: A folder to move items to instead of deleting them. Impacts individual asset deletions and node deletions. If falsey, then items will really be deleted instead of just moved.
- IMPORTANT : Each defined engine will run (saving, updating, etc), but the engine set to default will serve the files.
identities (optional)
- google Google Oath integration
- appId: The client ID is considered public information, and is used to build login URLs, or included in Javascript source code on a page.
- secret: The client secret must be kept confidential. If a deployed app cannot keep the secret confidential, such as Javascript or native apps, then the secret is not used.
- redirectUrl: The service will only redirect users to a registered URI, which helps prevent some attacks. Any HTTP redirect URIs must be protected with TLS security, so the service will only redirect to URIs beginning with "https". This prevents tokens from being intercepted during the authorization process.
- scopes: Scopes are strings that enable access to particular resources, such as user data. (https://www.googleapis.com/auth/userinfo.profile', https://www.googleapis.com/auth/userinfo.email)
- tokenEndpoint: Location that will generate an access token in the Google system
- oauthCallback: If the user grants the permission, the Google Authorization Server sends your application an access token (or an authorization code that your application can use to obtain an access token). If the user does not grant the permission, the server returns an error
bodyParser (optional)
bodyParser.limit is passed directly to the body-parser express middleware- the default value is,
2mb
Authentication
Membership is a critical component to almost all applications. Grasshopper's authentication methods are fully extensible, and it contains a robust permissions mechanism that allows you to protect data based off of the application’s requirements.
Supported Authentication Methods
- Basic: This is the typical username and password method
- Google: Allows you to authenticate with your Gmail account.
// Basic Authentication Example
grasshopper.auth( 'basic', { username: '', password: '' } ).then( function( token ) {
    // Store user's token somewhere
} ).done();

// Google Authentication Example
grasshopper.auth( 'google', { code: 'TMP GOOGLE TOKEN' } ).then( function( token ) {
    // Store user's token somewhere
} ).done();
Setup Google Login
- Ensure that the identities.google object on your ghapi.json is correctly setup.
- Ensure that you have added both a a redirect uri and a javascript origin to your Google Developer Console OAuth configuration.
- The javascript origin is the root of your website. For example:
http://localhost:3000https://www.grasshopper-admin-sample.herokuapp.com
- The redirect uri should be the root of your website with the following append to the end
/oauth2callback. This endpoint is where google will send the authenticated users temporary token. This endpoint already exists in Grasshopper-Api. This would create the following url's from the examples mentioned above:http://localhost:3000/auth2Callbackhttps://www.grasshopper-admin-sample.herokuapp.com/oauth2callback
- The javascript origin is the root of your website. For example:
- Setup the methods to get the googleAuthUrl from API then send the user there.
The
GET /googleurlendpoint is already available on Api.- This endpoint is not authenticated.
- This endpoint can also take an override redirect url. If you use this override, it will redirect the user back to that url with the grasshopper token in the url after all auth work is done.
- Modify your applications routes to collect the grasshopper token from the redirected route.
Grasshopper API will redirect the user back to your app with the grasshopper token appended to the redirectUrl you specified in your config. If you overrode this by passing it as a header in the
/geturlrequest, then it will be appended to that url.- If your redirectUrl in your config was:
/login, then the user is redirected to/login/{ grasshopperToken }. - If you overrode your redirectUrl then you will see:
/someOtherPage/{ grasshopperToken }. - Your route will need to be able to accept the returned url, in backbone, this might look like:
'login(/:token)'. Where the()signifies an optional param. Then a/. Then a:token. The word 'token' in the example is important as this will be passed the the route function as a parameter.
- If your redirectUrl in your config was:
- Once you have a handle on the grasshopper token, save it to local storage, prepended with 'Google '.
Check out our sample projects for examples of both of these authentication methods in working applications.
// Get Google Oauth Url Example
$.ajax({
        dataType : 'json',
        url : yourApiEndpoint + '/googleurl',
        type : 'GET'
    })
    .done(function(url) {
        window.location.href = url;
    });

// Get Google Oauth Url while override the redirectUrl
$.ajax({
        dataType : 'json',
        url : yourApiEndpoint + '/googleurl',
        type : 'GET',
        headers : {'redirectUrl' : '/someOtherPage'}
    })
    .done(function(url) {
        window.location.href = url;
    });

// If Using Backbone, your router might look like
Router.extend({
    routes : {
        'login(/:token)' : 'displayLogin'
    }
});

// Accept the token
function doGoogleLogin(token) {
    // Do something with google token.
};
Users
User Properties
    {
        _id: 12345657,
        role: 'admin',
        enabled: true,
        firstname: 'firstname',
        lastname: 'lastname',
        identities: {
            basic: {
                username: 'admin',
                salt: '111111111',
                hash: '282828282828282828'
            },
            google: {
                id: '292929292929292',
                accessToken: '474747474747'
                refreshToken: '4098409874'
            }
        },
        displayname : 'admin',
        linkedidentities : ['basic'],
        email: 'apitestuser@thinksolid.com',
        profile : {}
    }
- _id: Valid Mongo Object Id
- role: The users role, see below for more information on roles.
- enabled: Boolean indicating if the user is currently enabled or not.
- firstname: The users First Name.
- lastname: The users Last Name.
- identities: The Identities object represents the identities that the user has, this is private and will never be returned.
- basic: The basic identity represents the most simple form of auth.
- username: The Users username that they would use to login.
- salt: Salt for password.
- hash: Hash for password.
- google: The Identity object representing google auth.
- id: The users google id. Unique to all google users.
- accessToken: An access token used to auth the user for google services. This token expires.
- refreshToken: A token given by google to refresh the users access token.
- displayname: The users display name, if not set when creating a user, it will default to the login for basic auth, and the email address for google auth.
- linkedidentities: Array representing the identities the user has.
- email: The users email address.
- profile: The users profile, This can be an object containing anything.
User Roles
Roles (in order of power) :
- Admin - Can do anything.
- Editor - Can create and edit content and content types.
- Author - Can only create content.
- Reader - Can only read content.
- External - Cannot access the admin in any way.
User methods
users.query
- middleware.identity,
- middleware.role(roles.ADMIN),
- middleware.event('parse'),
- middleware.event('validate'),
- middleware.users.query,
- middleware.event('out')
users.insert
- middleware.identity,
- middleware.role(roles.ADMIN),
- middleware.users.linkedidentities.create,
- middleware.users.parse,
- middleware.event('parse'),
- middleware.event('validate'),
- middleware.users.validate,
- middleware.users.insert,
- middleware.event('out'),
- middleware.event('save')
users.update
- middleware.identity,
- setDefaultUser,
- roleOrSelf(roles.ADMIN),
- middleware.users.parse,
- middleware.event('parse'),
- middleware.event('validate'),
- middleware.users.validate,
- middleware.users.update,
- middleware.event('out'),
- middleware.event('save')
users.getById
- middleware.identity,
- setDefaultUser,
- roleOrSelf(roles.ADMIN),
- middleware.event('parse'),
- middleware.event('validate'),
- middleware.users.getById,
- middleware.event('out')
users.getByEmail
- middleware.identity,
- middleware.role(roles.ADMIN),
- middleware.event('parse'),
- middleware.event('validate'),
- middleware.users.getByEmail,
- middleware.event('out')
users.deleteById
- middleware.identity,
- middleware.role(roles.ADMIN),
- middleware.event('parse'),
- middleware.event('validate'),
- middleware.users.deleteById,
- middleware.event('out'),
- middleware.event('delete')
users.savePermissions
- middleware.event('parse'),
- middleware.event('validate'),
- middleware.identity,
- middleware.role(roles.ADMIN)
users.deletePermissions
- middleware.event('parse'),
- middleware.event('validate'),
- middleware.identity,
- middleware.role(roles.ADMIN)
users.linkIdentity
- middleware.event('parse'),
- middleware.event('validate'),
- middleware.identity,
- middleware.users.linkIdentity,
- middleware.event('out'),
- middleware.event('save')
users.unlinkIdentity
- middleware.event('parse'),
- middleware.event('validate'),
- middleware.identity,
- middleware.users.unLinkIdentity,
- middleware.event('out'),
- middleware.event('save')
Queries
Grasshopper's query builder accepts a query object that contains several parameters, some optional.
The returned object is an array with limit, skip and total. The total is the value of all content matched by query, not just returned objects.
Definitions for all possible query parameters/options
- filters: An array of optional filter objects for the query.
- key: The key of the content being filtered.
- cmp: The comparison operator for the filter value. Currently supported operators (Query accepts symbol or string value):
- '=': equals
- '!=' or 'not' or 'notequal' or 'notequals': not equal to
- '>=' or 'gte': greater than or equals
- '>' or 'gt': greater than
- '<=' or 'lte': less than or equals
- '<' or 'lt': less than
- 'in' or 'contains': contains
- '!in' or 'notin' or 'notcontains': does not contain
- '%' or 'like': like (Allows for 'fuzzy matching')
- '!%' or 'notlike': not like (Allows for 'fuzzy matching')
- 'between': between
- 'notbetween': not between
- 'size': size
- 'exists': exists
- value: Then value the filter will be compared with.
- types: An optional array of content type ids.
- nodes: An optional array of node ids.
- options: Object. Possible key/value pairs are:
- * limit : Limit number of results. String or number.
- * skip : Skip specified number of results. String or number. (limit and skip support pagination)
- * distinct : return distinct results within a find. Can include types.
- * exclude : array of fields to be excluded from query.
- * include : array of fields to be included in query.
Important Notes:
- The options object can have include or exclude parameters, but not both in the same query.
- When using 'options.distinct', filters can't be used. This means paging is not available.
Query object examples:

{ filters : [{ key : 'fields.label', cmp: '<', value: 'search test' }],
  types : [],
  nodes : [],
  options : { limit : 1,
              skip  : 2,
              distinct : 'fields.label',
              exclude : ['fields.newColumn']
            }
}

/*
- This object would return results  where 'fields.label' is less than the value 'search test.'
  It would limit the result to 1 document and skip the first 2 results.  It would only return documents
  where 'fields.label' is a distinct value.  It would also exclude
*/

{
    filters : [key : 'fields.slug' , cmp : 'equals', value: 'testValue'],
    types : ['2389vj2jf8r', 'ssjkl932'],
    options : {include : ['fields.label', 'fields.name', 'fields.description']}
}

/*
- This object would return results from content types '2389vj2jf8r' and 'ssjkl932' where 'fields.label',
  'fields.name' or 'fields.description' match the value 'testValue'.
*/

{
    filters : [
        key : 'fields.slug',
        cmp : 'between',
        value: [
            'exampleValue1', 'exampleValue2'
            ]
        ],
    nodes : ['83h7hjks8fhh'],
    options : {}
}

/*
- This object would return content with 'fields.slug' value between 'exampleValue1' and 'exampleValue2'
  from node '83h7hjks8fhh'.  Note that even though the options object is empty, query executes normally.
*/
Contributing
Grasshopper is an open source project that is available on Github and it has been sponsored by Solid Digital. We fully appreciate the contributions that have been made so far and we are excited for future development of this platform.
If you find bugs or have issues please submit them to github issues:
- Issues for Grasshopper Core
- Issues for Grasshopper API
- Issues for Grasshopper Admin
- Issues for Grasshopper CLI
To contribute back to the project, you should fork the projects make your changes and submit merge requests back to us.
Setting up your development environment
If you are doing full stack development on Grasshopper you should setup all projects in the solution to work locally.
The grasshopper-admin project comes with a server directory that can run grasshopper-api and the grasshopper-api project loads in grasshopper-core.
It is really easy to setup local versions of each of the projects so that you can do all of your development without publishing npms.
The key is to link your local grasshopper-core and grasshopper-api npms to be treated as globals.
More information on the technique using NPM LINK can be found here.
Before you start
Make sure that you development machine meets the minimum REQUIREMENTS
To test locally, you will be running a node app from /server. This app will run an instance of grasshopper-api. The app must be configured to serve the correct data (local or remote).
The configs are pulled from the environmental variable GRASSHOPPER_CONFIG if available or the fallback ghapi.json file.
Setup ghapi.json in the /server directory of the grasshopper-admin project. This is the config file that has the server and database info for your local dev work and it is .gitignored.
For an example of what this should look like, see CONFIGURING YOUR PROJECT.
Development server
The grunt server task will start a local express server running the API. It will also start a watch for the files in the admin project. If you save a file then it will be updates and the page will be refreshed.
If you make changes to your local core or api projects. This just restart the node server process to apply your changes.
When you finished
Once you are have finished your dev work on grasshopper-api or grasshopper-core, you should publish the npm or submit a merge request.
To test the new npm, you should unlink grasshopper-api and/or grasshopper-core and pull the dependency in from npm:
cd ~/workspace/grasshopper-admin/server
npm uninstall grasshopper-api
npm install --save grasshopper-api@[the newly published version]
Documentation around removing npm dependencies is available at:
https://www.npmjs.org/doc/cli/npm-uninstall.html
https://www.npmjs.org/doc/cli/npm-rm.html (npm unlink -h)
-- Help

-- Setup solution directory structure

mkir grasshopper
cd grasshopper
git clone git@github.com:Solid-Interactive/grasshopper-admin.git
git clone git@github.com:Solid-Interactive/grasshopper-api-js.git
git clone git@github.com:Solid-Interactive/grasshopper-core-nodejs.git

-- Install dependencies and link npms

cd {core project path} && npm install && npm link
cd {api project path} && npm install && npm link grasshopper-core && npm link
cd {admin project path} && npm install && bundle install && bower install && cd server && npm install && npm link grasshopper-api

-- Start dev server

cd {admin project path} && grunt server
Deploy to a test environment
If you have a heroku account, then you can deploy to it using the grunt deploy:heroku command .
What you need
- Your development environment should already be setup (see above)
- A ghapi.json file that includes your application configuration at
{proj-root}/ghapi.json - Set heroku environment variables (so you don't commit your private info). `
- Publish to heroku
grunt deploy:heroku
Once the environmental variables are on heroku there is no need to load them again, unless you want to change them.
If you ever need to update your environment variables just re-run grunt deploy:heroku:setupConfigs
-- Setting Remote Configuration

cd ~/{grasshopper-admin-directory}

grunt deploy:heroku:setupConfigs

-- Deploy to Heroku

cd ~/{grasshopper-admin-directory}

grunt deploy:heroku